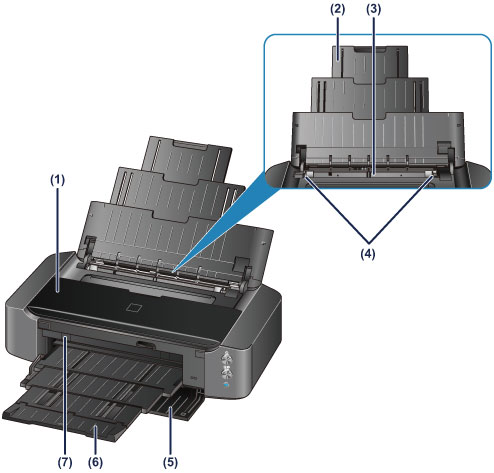
Front View

- (1) top cover
- Open to replace an ink tank or remove jammed paper inside the printer.
- (2) paper support
- Extend to load paper in the rear tray.
- (3) rear tray
-
Load paper here. Two or more sheets of the same size and type of paper can be loaded at the same time, and fed automatically one sheet at a time.
- (4) paper guides
- Align with both sides of the paper stack.
- (5) front cover
- Open to pull out the paper output tray before printing.
- (6) paper output tray
- Printed paper is ejected. Open it before printing.
- (7) disc tray guide
- Attach the disc tray here. Use when printing onto a printable disc. Keep closed for normal operation.

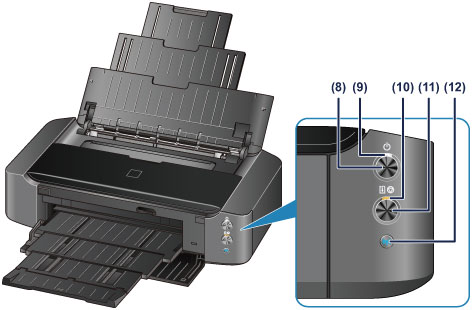
- * All lamps are shown lit in the above figure for explanatory purposes.
- (8) ON button
-
Press to turn the power on or off.
- (9) POWER lamp
-
Lights white after flashing when the power is turned on.
 Note
Note-
You can check the status of the printer by the POWER and Alarm lamps.
- POWER lamp is off: The power is off.
- POWER lamp lights white: The printer is ready to print.
- POWER lamp flashes white: The printer is getting ready to print, or printing is in progress.
- Alarm lamp flashes orange: An error has occurred and the printer is not ready to print.
- POWER lamp flashes white and Alarm lamp flashes orange alternately: An error that requires contacting the service center may have occurred.
-
- (10) Alarm lamp
- Lights or flashes orange when an error occurs.
- (11) RESUME/CANCEL button
- Press to cancel a print job in progress. You can press this button to release from printer error status and resume printing, after the printer problem is resolved.
- (12) Wi-Fi button/Wi-Fi lamp
-
Hold down to automatically set up the wireless LAN connection.
Lights or flashes blue to indicate the wireless LAN status.
- Lights:
- Wireless LAN connection is enabled.
- Flashes:
- Printing or scanning over wireless LAN. Also flashes while configuring the wireless LAN connection.

